понедельник, 30 октября 2017 г.

"Old friend" card

Hello there!
Today I have a very funny card that fits Halloween theme as well.


I had this window in my stash for quite some time I cut several of this with scissors and sponged with Walnut Stain Distress ink.


For the purple background I used Lilac Love and Lucky Lavender So Suzy ink bites. As you can see here they blend very nicely and when sprinkled with water leave those whitened spots like Distress Oxide inks. Love this effect!


These stamps are so cool by Crackerbox stamps company called:
Old Friend sentiment 
and
Highland Spring Ink Bite Set ( Lilac Love and Lucky Lavender )

Thank you so much for stopping by! Have a lovely day!
~ Olesya Kharkova

Related Posts Plugin for WordPress, Blogger...

пятница, 27 октября 2017 г.

Happy Halloween card

Hello there!
Today I'm here to share with you a Halloween card using Candy Apple Witch image by Mo's digital pencil ( Mo Manning).


It's a great image to master your coloring skills with fabric folds. This one i colored with Chameleon pens and pencils.


For the background I used Twisted Citron, Peeled Paint and Forest Moss Distress inks to create the lawn and Dusty Concord with Black Soot Distress ink for the sky.


For the bats i used Bats Flying By stamp by Crackerbox stamps, and the sentiment is by MME HAppy Haunting set.I like very simple designs when the main goal is to attract all the attention to the colored image.
Thank you so much for stopping by! Have an amazing day!
~ Olesya Kharkova
Related Posts Plugin for WordPress, Blogger...

Masculine birthday card

Hello there!
I heard that many of crafters were struggling with masculine designs for their cards. I don't think that it's a big problem to make a masculine card as long as you don't think that all men cards should contain gears, or smth with techy feel, you know. For me masculine cards are the same as feminine without flowers of course and they can be the same bright and cheerful.
My friend ( a man) had his birthday a couple of months ago ( yes!! belated card) and I know for sure that he needs a very cheerful card to lift him up ( that apathism sucks).


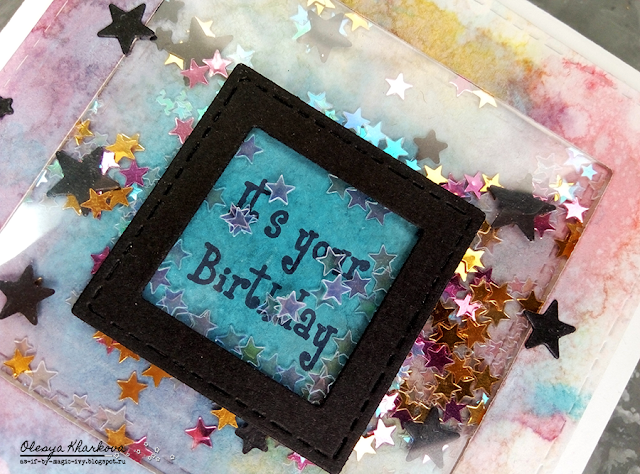
I like my Distress Oxide inks so much but never tried Tim Holtz's favorite demo techniques with bright inky puddles. It turned out interesting. I was waiting for my parcel with all the rest Oxides to come and decided to mix Oxides i had with several regular Distress Inks. I was careful not to make mud out of it and the result was very pretty.
I used:
Seedless Preserves Distress ink


I love making double shaker elements on one card, it looks very attractive.


I also like small sentiments that fit even a small square frame like this. The entire card measures 10x10cm. Love this size so much :) so you can imagine how small this sentiment is. It's Birthday stamp by Crackerbox stamps.

Thank you so much for stopping by! Have a nice day!
~ Olesya Kharkova
Related Posts Plugin for WordPress, Blogger...

Yummy cards ft Maya Road and Chameleon pens

Hello there!
Today is Friend Friday with Maya Road brand and Chameleon pens. What a great blend I should say!
I like to think up creative usage for the dies that seem very simple. For example that card below is made with Enjoy Coffee Die Bundle and I made a cup with three scoops of ice-cream. Colored the die cuts with Chameleon pens.


Die cut the word Enjoy several times and adhered them all together to get very thick dimensional piece.


Here's the actual die bundle:


The second card is all about friendship overseas :)


You can find downloadable instructions right → HERE ←at Chameleon pens blog on how to make this card. Really fun!


Love this card so much and already sent it to my friend and co-worker from the USA.


Thank you so much for stopping by! Have an amazing day!
~ Olesya Kharkova
Related Posts Plugin for WordPress, Blogger...

среда, 25 октября 2017 г.

Candy box или Сладкая коробочка

Hello there!

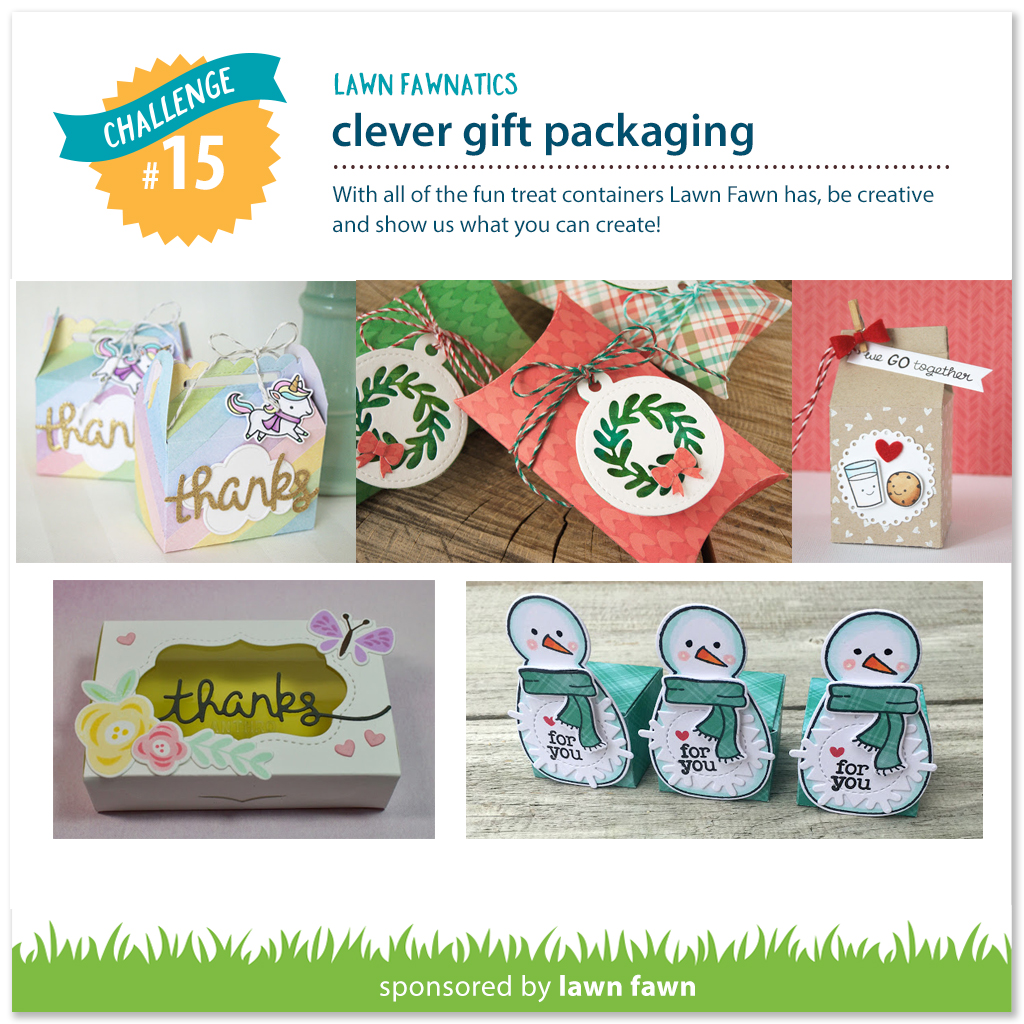
Have you seen the current challenge at Lawn Fawnatics challenge blog called Clever gift packaging? It's worth seeing just to get a huge wave of inspiration from the design team and more from the participants, just look at the link collection at the end of the post. Awesome! Some time ago I made similar oven box but now I decided to make it again but even cuter. It will be a box for candies or even a small gift like jewerly will fit here perfectly. My friend whom this box will be sent likes cooking so much so this package is an extra reminder of what an  awesome cook she is.
-------------------------------------------------------------------------------------------------------------------------
Всем привет! Я тут наткнулась на задание от блога Lawn Fawnatics challenge - Умная упаковка для подарка. Сначала подумала, что это задание совсем не про меня, потому что моя семья ( более старшее поколение) явно такие штуки не оценит, но вспомнила, что в Америке у меня есть подруга, которая очень любит готовить, а я до жути люблю штампы Lawn Fawn  с кухонной тематикой. Как-то давно я уже делала подобную коробочку, но сейчас решила переделать и сделать помилее. Это коробка для маленьких конфеток, но так же подойдет и для ювелир украшения. 


First of all I should say that it took me awhile to assemble this box as I made my own scheme for the box to fit the sizes of the stamped oven. And for the next time I'd better find just any small box and adhere to the oven)) Even though it was time consuming my friend will appreciate it for sure :)
------------------------------------------------------------------------------------------------------------------------
В первую очередь должна признаться, что эта коробка заняла у меня какое-то время на сборку, потому что я погрязла в расчетах собственной схемы, чтобы она была такого же размера как и печка. А так как я полный гуманитарий, пришлось подключить мужа)) Думаю, что такие подарки (затратные по времени) нужно дарить только тем, кто обязательно это оценит, чтобы потом не расстраиваться. Мой подруга точно оценит :)


For this box I used:
Sprinkled with Joy stamp set by Lawn Fawn
Baked with Love stamp set by Lawn Fawn

I heat embossed the oven with clrar powder on top of Memento Tuxedo black ink and then colored with alcohol Chameleon pens. I had no add-ons dies to the oven and made the handle very easily by cutting out a stip of paper and folding it like a pop up handle. I thought it would be very cute and pretty and have a fabric towel on the handle instead of paper one and cut a rectangle piece of white fabric making that cute fringe.
--------------------------------------------------------------------------------------------------------------------------
В работе использовала штампы, указанные с ссылками повыше. Это как раз те самые любимые два кухонных набора.
Что касается печки: я сначала отштамповала изображение, затем посыпала прозрачной пудрой для эмбоссинга и запекла феном. Затем все раскрасила спиртовыми маркерами Chameleon. Отдельно к набору с печкой можно купить доп ножи, они вырезают ручку, полотенчико и еще что-то мелкое, но я не люблю покупать то, что и сама могу сделать, тем более, что ручку вырезать можно на раз-два. Полотенчико сделала из белой ткани и на концах бахрому для доп милашности :)


To show the recepient where to open the box I stamped Open me words on one of the flaps.
------------------------------------------------------------------------------------------------------
Часто была свидетелем, как коробку открывают не с того конца, раздирая ее в разные стороны ( и мое сердце вместо с ней)), поэтому штампанула фразу "Открой меня" на правильном язычке коробки.


Спасибо большое за внимание! Отличного всем настроения!
-----------------------------------------------------------------------
Thank you so much for stopping by! Have an amazing day!
~ Olesya Kharkova
Related Posts Plugin for WordPress, Blogger...

вторник, 24 октября 2017 г.

Christmas village/ Зимняя деревушка

Hello there, dear friends!
Today I'm here with my super exciting 3D project I've been dreaming of for so long - Christmas village. I wanted to make a small project with lights , to make these houses give warmth and Christmas feel. I can confess - I'm so very happy with how it has turned out!
----------------------------------------------------------------------------------------------------
Всем привет!
Сегодняшний пост настолько для меня волнительный, что просто не описать :) Давно у меня в голове крутилась идея деревушки с лампочками, которая по вечерам будет дарить теплое сияние из окон и вообще радовать своим общим видом и чтобы по размеру была крошечная, так как питаю необъяснимую любовь к миниатюре. И вот... за один вечер села и сделала. Все-таки для каждой идеи - свое время. И я в таком диком восторге от нее!


I used our Russian brand dies called Mimicut - Cute houses, they cut only the front panel with windows and doors, all other details like walls and roofs I made myself.
-------------------------------------------------------------------------------------------------------------------
Сразу скажу, что для домиков я использовала ножи Mimicut - Домимики. Вырубают они только фасады, остальное я достроила сама.


All the houses have acetate windows covered with snow. All around is blocked with snow made with cotton and glitter. 
------------------------------------------------------------------------------------------
У всех домиков есть окна из пластика, покрытые инеем, двери занесло снегом из ваты и глиттера.


The roofs also covered with snow out of Bo Bunny Sugar glitter paste and dry glitter.  Colored with alcohol Chameleon pens.
-----------------------------------------------------------------------------------
Крыши тоже покрыты снегом из текстурной глиттер пасты и блесток. Раскрашены спиртовыми маркерами Chameleon.


All is shining and sparkling here magically.
------------------------------------------
Все переливается и сверкает.


But when it's hetting dark outside all the houses turn on the lights and start glowing with different colors due to Christmas lights inside the houses that have also different features of lighting.
-------------------------------------------------------------------------------------------------------------
Как только на улице темнеет, в деревне загораются разноцветные огоньки. В каждом домике лампочка гирлянды, которая так же имеет разные режимы работы.


This is how the village looks like with glowing windows. Absolutely magical!
--------------------------------------------------------------
Вот так деревушка преображается с огоньками.


The village is quite small, just 20 cm in length. It is based on my distress ink storage box. The biggest house is just 3.5 cm and the smallest one - 2.5 cm. It's super tiny and cute!
--------------------------------------------------------------------------------------------------------
Деревушка всего 20 см длиной, живет у меня на домике для дистресс чернил. самый крупный домик 3,5 см, а маленький -2,5 см. Деревушка милашечная невероятно.


Спасибо большое за внимание! Отличного всем настроения!
--------------------------------------------------------------------
Thank you so much for stopping by! Have a magical day!
~ Olesya Kharkova
Related Posts Plugin for WordPress, Blogger...

понедельник, 23 октября 2017 г.

"You're wonderful" card

Hello, crafty friends!
Today I've come here with smth very feminine and delicate, a card for my University friend. In some days she has a birthday and I wanted to make a card in soft colors for her. She's really wonderful and I highlighted it in die cut words.
The design is quite versatile and can easily fit Wedding theme.
----------------------------------------------------------------------------------------------------------
Всем привет!
Пришла я сегодня с очень нежной работой для моей дорогой подруги со времени универа. Мне хотелось сделать какую-то очень изящную женственную открытку для нее. Она сама по себе удивительный человек, готовый всегда прийти на помощь, подсказать, поддержать советом и просто добрым словом. Таких людей очень мало в моей жизни и поэтому, наверное, очень ценен каждый из них.


There's Russian paper brand that releases wonderful paper on snow white background ( with rare thing here), thick sheets and amazing motives for cutting out. This brand is called Magic Creative ( you can find it on Instagram with this name). I cut out several flowers as well as wood slices and made cluster adding several die cut beaded stems.
-------------------------------------------------------------------------------------------------------------------
У нас есть один интересный производитель бумаги, у которого мне посчастливилось поработать в дизайн команде, который называется Магия Творчества. У них очень плотная бумага, с белоснежным фоном ( что большая редкость сейчас) и невероятными листами для вырезания. Я взяла для этой работы листы для вырезания из коллекции Шепот ветра. Товарищи, вы не представляете, какая это красивая коллекция. Я купила только два листа, и, наверное жалею, что не купила весь набор. Он очень атмосферный, теплый, рустикальный.
Дизайн открытки довольно универсальный и с легкостью может подойти для свадебной открытки.


The word Winderful is by Concord&9th called Wonderful Words dies. I really adore die cut words and in mirror cardstock in particular.
-----------------------------------------------------------------------------------------------------------------------
Слово Wonderful из набора ножей бренда Concord &9th, называется Wondeful Words. Очень мне нравятся вырубные слова, особенно из фольгированного картона. Так же добавила белые тычинки от Fantasy. Что касается кружевной полоски под цветами - это кружевной скотч, купила его 100 лет назад и вот, пригодился))


Спасибо большое за внимание! Отличного всем дня!
---------------------------------------------------------------------------------------

Thank you so much for stopping by! Have an amazing day!
~ Olesya Kharkova
Related Posts Plugin for WordPress, Blogger...

воскресенье, 22 октября 2017 г.

Bright autumn card + Video ft So Suzy stamps

Hello there, dear crafters!

Today is an awesome autumn day like any other but rain here makes it even better for me :) I wish I could share my feelings with you, and the only way to do it via my projects to inspire you and make everybody's day a bit brighter.
So today's card is all about fresh but warm autumn with bright leaves and drops of rain featuring So Suzy stamps.


I used here:
Line Leaf 3 So Suzy stamp
Sunny and Bright So Suzy stamp


To know how i made this card, please watch the video :


Thank you so much for stopping by! Have a very bright autumn day!
~ Olesya Kharkova
Related Posts Plugin for WordPress, Blogger...

среда, 18 октября 2017 г.

Happy autumn card или Осенний привет

Всем привет! Ощущение, что я сто лет по-русски тут не писала и спешу сразу же спросить, если кто-то читает, нужен ли перевод на русский? Так как я пишу в основном в зарубежных блогах, то и язык соответствующий и мне как-то стало проще сразу писать на английском. Я зачем пришла-то)) Добралась я-таки до челлендж блога Мемуарис, сколько раз порывалась принять участие в их заданиях и все никак, но на этот раз пройти просто не могла, вы только посмотрите на этот скетч ( фото в самом низу) № 41. Там же круги! Для меня круги, как для кота коробка.
-------------------------------------------------------------------------------------------
Hello there!
Autumn is so inspiring so I made cards every single day and so happy about that! This time I was super inspired by the sketch challenge #41 ( pic of the sketch is down below) at Memuaris blog. That was my fave design team I was on and have only warm feelings to it. You know I love circles so i just couldn't pass by :)


По скетчу у меня получилась открытка - шейкер с тремя окошками и плоскими пайетками.  Люблю их нежно, они совсем крошечные и плоские, как раз для одного слоя вспененного скотча. Купила я их, кстати, как раз в Мемуарисе. Вообще с Мемуарисом меня связывают самые теплые воспоминания и несколько сезонов потрясающей работы в коллективе ❤
----------------------------------------------------------------------

It's a skaker card with three windows filled with tiny flat gold sequins.


А сейчас немного про открытку :) Нижний слой - бумага для скрапбукинга, я полагаю, из Италии от моей подруги по американской команде. Она очень тонкая, похожа на нашу бумагу для оригами. Но принты совершенно потрясающие, такие осенние с птичками. Мне нравится! Ножи с листьями от Fantasy, не могу нарадоваться покупке, давно хотела себе всякие листья осенние. Так же затонировала края дистресс чернилами Walnut Stain.
--------------------------------------------------------------------------------
The bottom layer was an autumn themed thin paper I got from my friend from Italy - Giada ❤ It's of very light beautiful blue color to represent autumn air and sky. It seems my fave color combo for autumn cards - bright + blue + kraft. Feel very cozy about that :) I also sponged the edges of the panel as well as the circles with Walnut Stain Distress Ink. 


А вот и сам скетч, прекрасен, правда? Я уже глаз положила на другое задание с овощами там же в Мемуарисе, но загадывать пока не буду :)
--------------------------------------------------------------------------------------
Here's the sketch itself. Love it very much!

Спасибо большое за внимание! Отличного всем осеннего погожего денька!
--------------------------------------------
Thank you so much for stopping by! Have an amazing day!
~ Olesya Kharkova

Related Posts Plugin for WordPress, Blogger...

вторник, 17 октября 2017 г.

Coffee cats ft The Ton stamps

Hello there, crafty friends!

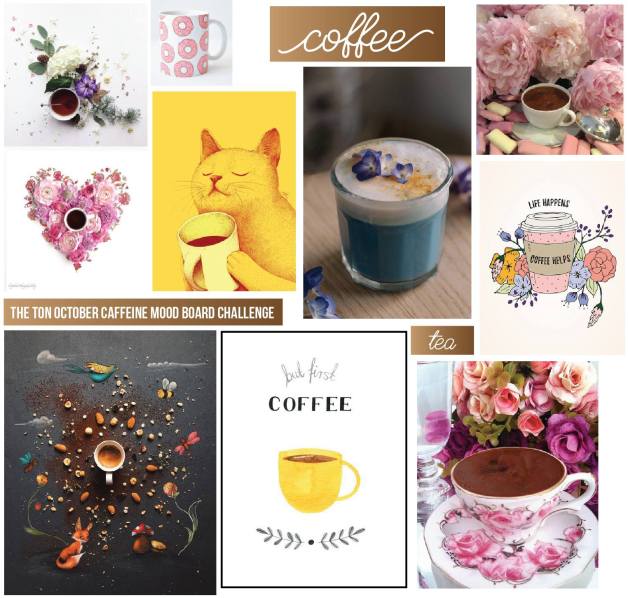
Several days ago I came across very inspiring mood board over at The Ton challenge blog and this idea with coffee cats suddenly appeared in my head.


I have only two stamp sets by the Ton but it didn't stop me from entering the challenge as long as I used Love and a Cat stamp set images for my focal triange, so to speak :) Colored the cats with alcohol Chameleon pens.


For the coffee cup I used Maya Road Enjoy Coffee die set and Crackerbox stamps Hello. I also die cut several leaves and sponged them with Wild Honey and Barn Door Distress inks.


And here's the board itself


Love this challenge so much! Hope you got inspired too!
Thank you so much for stopping by! Have an amazing day!
~Olesya Kharkova
Related Posts Plugin for WordPress, Blogger...

понедельник, 16 октября 2017 г.

Guest Designing at Aurora Wings

Hello there, crafty friends!
So sorry smth went wrong and all my text disappeared(( But here I am again telling you a great news that I'm a guest designer over at Aurora Wings challenge blog. You know how I love Mitzi's digital stamps and her sprite collection in particular. But today's card is a little bit different and so happy to announce the theme - challenge #59 Darkness Falls.


For this card I used Young Witch and a Cat image. Colored it with alcohol Chameleon pens and pencils.


Added my fave white gel pen and Honey Gold glitter nuvo drops.


 I love this Halloween card so much! And Thank you Mitzi for inviting me, it was a true pleasure to color this image!
Thank you so much for stopping by! Have an amazing day!
~ Olesya Kharkova
Related Posts Plugin for WordPress, Blogger...