Показаны сообщения с ярлыком 3D projects. Показать все сообщения

вторник, 15 мая 2018 г.

New challenge| Suzy & Crackerbox stamps

Hello there, crafty friends!
So glad to announce our very first challenge over at So Suzy & Crackerbox blog called Masculine cards.

The challenge will run from May 15th till June 14th.
The participants can use ANY stamps, just need to follow the theme.
If participants use So Suzy Stamps or Crackerbox Palace Stamps they will have a double change to win.
Winner will be announced the 15th on the next challenge.
Prize will be a $25 Gift Certificate for So Suzy Store + a chance to become a guest designer! 
All projects need to be new and the link need to be directly to the blogpost or gallery not the entire blog for an easy way to find a project.


Here's my project I've made for a very close friend of mine whose name is Alexander.


I used my very fave stamp by So Suzy called Beech Line Leaf. Stamped the leaves with Green Apple SSS ink onto light green cardstock to get tone on tome look. Really love the result. Them cut them out with scissors.


For the background of my photo frame I chose camping themed paper ( don't remember the brand's name, First Edition I suppose).


To cut all those latters I used PTI Polka Dot Parade Alphabet Upper Die. And using a colored pencil I drew woodgrain texture.


Thank you so much for stopping by! Have a very special day!
~ Olesya
Related Posts Plugin for WordPress, Blogger...

пятница, 20 апреля 2018 г.

Late Easter decorations | Mo's digital pencil

Hello there!
So happy to be here again after a small but super cool break related to my workshop classes in Moscow. Those days were awesome! I'm back overlaoded with positive metions and vibes and ready to share with you a project I've made before Easter but had no chance to post.


I used absolutely adorable Ava image by Mo's digital pencil. Colored it with my Chameleon pens and pencils.


That was a topper to decorate Easter eggs box. I also added my fave leaves cut with Altenew Fantasy Floral 3D die set and a Twig Wreath die set of my design (Agiart).


A couple of Morning Dew drops by Nuvo and the topper was finished.


Thank you so much for stopping by! Have a beautiful day!
~ Olesya Kharkova
Related Posts Plugin for WordPress, Blogger...

среда, 25 октября 2017 г.

Candy box или Сладкая коробочка

Hello there!

Have you seen the current challenge at Lawn Fawnatics challenge blog called Clever gift packaging? It's worth seeing just to get a huge wave of inspiration from the design team and more from the participants, just look at the link collection at the end of the post. Awesome! Some time ago I made similar oven box but now I decided to make it again but even cuter. It will be a box for candies or even a small gift like jewerly will fit here perfectly. My friend whom this box will be sent likes cooking so much so this package is an extra reminder of what an  awesome cook she is.
-------------------------------------------------------------------------------------------------------------------------
Всем привет! Я тут наткнулась на задание от блога Lawn Fawnatics challenge - Умная упаковка для подарка. Сначала подумала, что это задание совсем не про меня, потому что моя семья ( более старшее поколение) явно такие штуки не оценит, но вспомнила, что в Америке у меня есть подруга, которая очень любит готовить, а я до жути люблю штампы Lawn Fawn  с кухонной тематикой. Как-то давно я уже делала подобную коробочку, но сейчас решила переделать и сделать помилее. Это коробка для маленьких конфеток, но так же подойдет и для ювелир украшения. 


First of all I should say that it took me awhile to assemble this box as I made my own scheme for the box to fit the sizes of the stamped oven. And for the next time I'd better find just any small box and adhere to the oven)) Even though it was time consuming my friend will appreciate it for sure :)
------------------------------------------------------------------------------------------------------------------------
В первую очередь должна признаться, что эта коробка заняла у меня какое-то время на сборку, потому что я погрязла в расчетах собственной схемы, чтобы она была такого же размера как и печка. А так как я полный гуманитарий, пришлось подключить мужа)) Думаю, что такие подарки (затратные по времени) нужно дарить только тем, кто обязательно это оценит, чтобы потом не расстраиваться. Мой подруга точно оценит :)


For this box I used:
Sprinkled with Joy stamp set by Lawn Fawn
Baked with Love stamp set by Lawn Fawn

I heat embossed the oven with clrar powder on top of Memento Tuxedo black ink and then colored with alcohol Chameleon pens. I had no add-ons dies to the oven and made the handle very easily by cutting out a stip of paper and folding it like a pop up handle. I thought it would be very cute and pretty and have a fabric towel on the handle instead of paper one and cut a rectangle piece of white fabric making that cute fringe.
--------------------------------------------------------------------------------------------------------------------------
В работе использовала штампы, указанные с ссылками повыше. Это как раз те самые любимые два кухонных набора.
Что касается печки: я сначала отштамповала изображение, затем посыпала прозрачной пудрой для эмбоссинга и запекла феном. Затем все раскрасила спиртовыми маркерами Chameleon. Отдельно к набору с печкой можно купить доп ножи, они вырезают ручку, полотенчико и еще что-то мелкое, но я не люблю покупать то, что и сама могу сделать, тем более, что ручку вырезать можно на раз-два. Полотенчико сделала из белой ткани и на концах бахрому для доп милашности :)


To show the recepient where to open the box I stamped Open me words on one of the flaps.
------------------------------------------------------------------------------------------------------
Часто была свидетелем, как коробку открывают не с того конца, раздирая ее в разные стороны ( и мое сердце вместо с ней)), поэтому штампанула фразу "Открой меня" на правильном язычке коробки.


Спасибо большое за внимание! Отличного всем настроения!
-----------------------------------------------------------------------
Thank you so much for stopping by! Have an amazing day!
~ Olesya Kharkova
Related Posts Plugin for WordPress, Blogger...

вторник, 24 октября 2017 г.

Christmas village/ Зимняя деревушка

Hello there, dear friends!
Today I'm here with my super exciting 3D project I've been dreaming of for so long - Christmas village. I wanted to make a small project with lights , to make these houses give warmth and Christmas feel. I can confess - I'm so very happy with how it has turned out!
----------------------------------------------------------------------------------------------------
Всем привет!
Сегодняшний пост настолько для меня волнительный, что просто не описать :) Давно у меня в голове крутилась идея деревушки с лампочками, которая по вечерам будет дарить теплое сияние из окон и вообще радовать своим общим видом и чтобы по размеру была крошечная, так как питаю необъяснимую любовь к миниатюре. И вот... за один вечер села и сделала. Все-таки для каждой идеи - свое время. И я в таком диком восторге от нее!


I used our Russian brand dies called Mimicut - Cute houses, they cut only the front panel with windows and doors, all other details like walls and roofs I made myself.
-------------------------------------------------------------------------------------------------------------------
Сразу скажу, что для домиков я использовала ножи Mimicut - Домимики. Вырубают они только фасады, остальное я достроила сама.


All the houses have acetate windows covered with snow. All around is blocked with snow made with cotton and glitter. 
------------------------------------------------------------------------------------------
У всех домиков есть окна из пластика, покрытые инеем, двери занесло снегом из ваты и глиттера.


The roofs also covered with snow out of Bo Bunny Sugar glitter paste and dry glitter.  Colored with alcohol Chameleon pens.
-----------------------------------------------------------------------------------
Крыши тоже покрыты снегом из текстурной глиттер пасты и блесток. Раскрашены спиртовыми маркерами Chameleon.


All is shining and sparkling here magically.
------------------------------------------
Все переливается и сверкает.


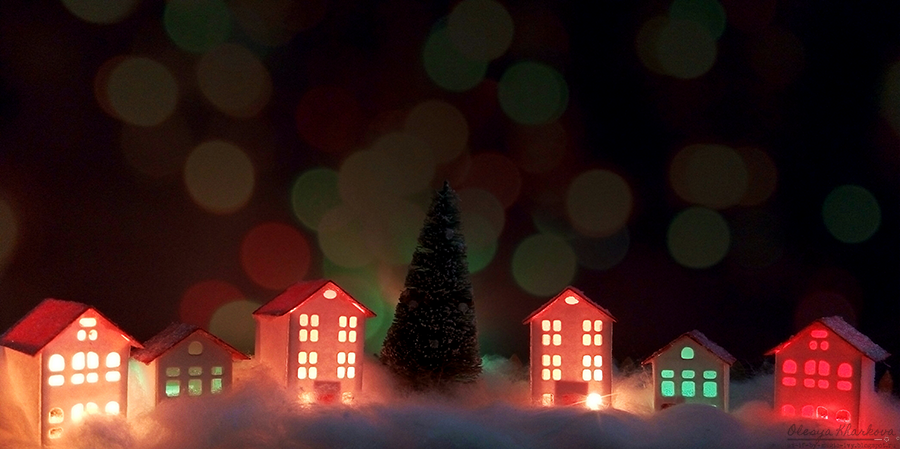
But when it's hetting dark outside all the houses turn on the lights and start glowing with different colors due to Christmas lights inside the houses that have also different features of lighting.
-------------------------------------------------------------------------------------------------------------
Как только на улице темнеет, в деревне загораются разноцветные огоньки. В каждом домике лампочка гирлянды, которая так же имеет разные режимы работы.


This is how the village looks like with glowing windows. Absolutely magical!
--------------------------------------------------------------
Вот так деревушка преображается с огоньками.


The village is quite small, just 20 cm in length. It is based on my distress ink storage box. The biggest house is just 3.5 cm and the smallest one - 2.5 cm. It's super tiny and cute!
--------------------------------------------------------------------------------------------------------
Деревушка всего 20 см длиной, живет у меня на домике для дистресс чернил. самый крупный домик 3,5 см, а маленький -2,5 см. Деревушка милашечная невероятно.


Спасибо большое за внимание! Отличного всем настроения!
--------------------------------------------------------------------
Thank you so much for stopping by! Have a magical day!
~ Olesya Kharkova
Related Posts Plugin for WordPress, Blogger...